A Simple Guide from My Kitchen to Yours
There’s something deeply grounding about making a salve. For me, it usually starts in the garden—or out back with a jar and a kid or two helping me gather calendula, plantain, or yarrow. It’s slow work. Honest work. The kind that makes you feel like you’re doing something your great-grandmother would nod in approval at.
When I first started making salves, I had no idea what I was doing. I followed scraps of instructions, burned a few batches of beeswax, and spilled more oil than I care to admit. But little by little, I figured it out, and now I can’t imagine our home without a few tins tucked into drawers and baskets.
So here’s how I make my salves—simple, clean, and full of purpose.
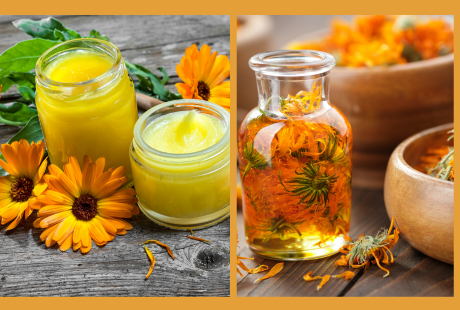
Step 1: Start with an Infused Oil
This is the heart of the salve. I usually use dried herbs (because fresh ones can cause spoilage) and a gentle oil like:
Olive oil
Avocado oil
Sunflower oil
My process:
Fill a clean jar halfway with dried herbs (calendula, plantain, comfrey—whatever I need).
Cover with oil, making sure all the herbs are submerged.
Let it sit on a sunny windowsill for 3–6 weeks, shaking gently every day or two.
If I need it fast, I use a low heat method—placing the jar in a water bath or slow cooker for 4–6 hours.
Step 2: Strain & Combine with Beeswax
Once my oil is ready, I strain out the herbs using cheesecloth or a fine mesh strainer.
Depending on the recipe that I am making, I would measure out the amounts needed for each and have that ready to go.
1) Pour the infused oil into a heat-safe bowl or double boiler.
2) Add beeswax pastilles (about 1 oz per 4 oz of oil for a medium firmness).
3) Gently heat and stir until fully melted.
💡 Tip: Want a firmer balm for travel? Add more wax. Want something soft and creamy? Use less.
Step 3: Add Extras (If You Like)
At this stage, I’ll sometimes add:
A few drops of essential oils (lavender, tea tree, or frankincense—just a few!)
A dash of vitamin E to help preserve
Or nothing at all—sometimes simple is best
Then I pour into clean tins or jars, let them cool, and label them. That’s it.
How I Use My Salves
I keep different ones for different needs:
First aid salve for cuts and scrapes (plantain + yarrow + lavender EO)
Calendula balm for dry skin, diaper rash, and gentle healing
Muscle rub with arnica, cayenne, and peppermint
Chamomile & lavender balm for sleep and little nerves
Sometimes I give them away. Sometimes I tuck them into care baskets. But mostly, we just use them. All the time.
You Can Do This Too
If you’ve got a handful of herbs, a bit of oil, and a quiet afternoon—you can make a salve. And you should. It’s one of the easiest, most satisfying ways to reconnect with your roots, your wellness, and your sense of I can do this.
That’s what herbalism is, really. Not fancy. Just full of life.
—
👉 Want my printable salve-making guide with ratios, tips, and my favorite starter herbs? Grab it here:
https://rockcreeksundries.com/herbal-salve-recipe