(Even If You’re a Total Beginner)
I didn’t grow up with herbal medicine. Like most people, I started with what I had: a bottle of lavender oil, a dusty jar of chamomile tea, and a deep desire to do better for my family. That’s how my home apothecary started—slowly, messily, and with more curiosity than confidence.
Now, years later, I can honestly say: you don’t need a degree, a greenhouse, or a Pinterest-perfect cabinet to start your own. You just need a willingness to learn, a few key supplies, and a little space to call your own.
Here’s how I built my home apothecary—and how you can too.
Step 1: Start Small and Use What You Have
You don’t need to buy everything at once (trust me—I’ve done that, and it’s overwhelming). Start with herbs and remedies you’ll actually use.
When I first began, I kept:
Dried chamomile for calming tea
Plantain (fresh or dried) for bug bites and stings
Lavender buds for skin soothing and sleep
Calendula for skin healing
Peppermint for tummy aches and tension
I still use these almost weekly.
** Tip from experience: Focus on your family’s needs. If someone’s always getting scrapes, start with a healing salve. If sleep is a struggle, try herbs that calm and relax. Build from there. We go camping often, so I created things that I know will be needed specifically while on the go.
Step 2: Gather Simple Tools & Storage
You don’t need a whole lab setup—just a few basics:
Glass jars for infusions and storage
Strainers or cheesecloth
Amber bottles for tinctures and sprays
Labels and a Sharpie (ask me how many times I’ve forgotten to label something… So…Many…Times)
I started by using leftover pasta sauce jars and old spice tins. Don’t wait until everything’s picture-perfect. Just begin.
Step 3: Learn to Make the Basics
Once I felt ready, I started experimenting with:
Infused oils (like calendula in olive oil)
Herbal teas (simple blends for digestion, immunity, or calm)
Salves (adding beeswax to infused oil for healing balms)
Tinctures (herbs soaked in alcohol for long-term use)
I still remember the first salve I made—it was messy, too stiff, and absolutely magical. My kids thought I had invented something ancient.
Step 4: Keep a Notebook
This one is big for me now. I keep a simple apothecary notebook with:
#1 What I made
#2 When I made it
#3 What herbs I used
#4 How it worked (or didn’t)
#5 Who it helped
It’s part recipe book, part family history. I hope someday my kids will read it and smile at the notes in the margins.
Step 5: Make It Yours
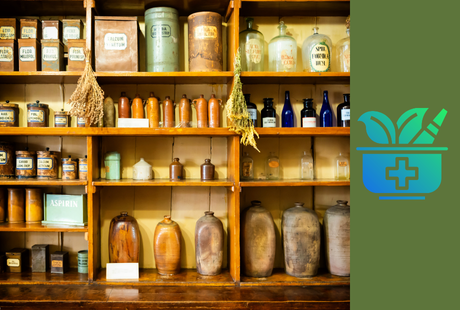
I keep my apothecary goods in a simple cabinet. Some people use wooden crates, others use kitchen drawers. You don’t need a certain type of vibe or a fancy hutch.
Your apothecary should feel like home. Mine smells like beeswax and dried herbs, and it’s filled with things I’ve made with my own hands—for my own people.
You Can Start Today
If I could go back and tell myself one thing, it would be this: You don’t have to know it all before you start. You learn by doing.
You already have what it takes to care for your family naturally. You just need a little knowledge, a little courage, and a quiet space to begin.
And I’m right here if you need help.
—
Want a free checklist of my favorite beginner herbs and tools? Grab it here:
https://rockcreeksundries.com/start-your-apothecary